
November is here again. Here are a few photos from the autumn so far. Days are getting shorter but when the sun peeks through the clouds for a short moment, the light can be incredible.

Birds and Nature – Europe Visit
We are visiting family in Europe for Christmas and New Year. Here are a few nature photos.


Not sure of the species.


Oystercatcher!


Jackdaw


Robin


Hooded Crow

Filed under Uncategorized
Birds around the house
Popped out for a quick look around and found some beautiful birds.


Filed under Uncategorized
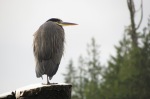
Birding at the Sarita
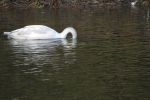
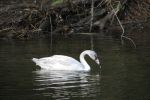
Dave and I took a short trip out to the Sarita River to have a look at who would be eating the last of the salmon carcasses. We were expecting eagles, but also got a wonderful surprise – a juvenile trumpeter swan! (It may be a tundra swan… can any birders out there confirm?)


-
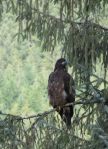
- Juvenile Bald Eagle

-
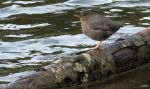
- American Dipper


-

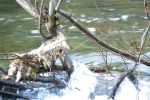
- Juvenile Trumpeter Swan – eating a salmon carcass

-

- Juvenile Bald Eagle in flight


Filed under Fauna, Posts by Hana
Building a cold frame
This morning skies were hazy, our day was moving slow, and we needed a project.
Step 1: Go to the hardware store and ask what is needed to build a raised bed with a cold frame. Builder Bob gave us some great ideas and then had to run to catch the supply boat. We went home and watched a few youtube videos on how it’s done. This one is my favourite. Materials needed: Four 8×2 boards (ours are spruce, which is inexpensive and was not pressure treated), a sack of 3″ nails (though some shorter ones would have been good too), 1″x1″ sticks, about 8 or 10′ (I don’t know the building term for these), 24′ of 1/2″ PVC piping, 6 pipe clamps, a hammer, a pencil, a tape measure and a saw. And some plastic (though we didn’t finish that part today).

Step 2: Get supplies, spread them out. We decided on a 4’x4′ box. Boards come in 8′ pieces and 4′ is a great size since you can reach across it fairly easily. So we got four 8′ boards. This picture only shows three because Dave is in the process of cutting the fourth one in half. We cut all of them in half, to prepare for the next part.

Step 3: Make the sides of the raised bed. We used some 1″x1″ as a cleat first to secure the two halves of a board together (this makes the raised bed two board widths deep). Later, we used this cleat to help hold the corners of the raised bed together.

We only did this for two sides of the bed. The other two sides we used the 1″x1″ to secure the boards together in one place: the centre. I didn’t take any pictures of this part.

Step 4: Attach the pipe clamps. We decided that the pipes would be fitted to the inside of the raised bed, even though we had seen others attach them to the outside. Dave nailed them in using some shorter 2″ nails we found in the basement.

We only did this on two sides. The PVC pipe will be anchored to them, and bent over to the other side to form the structure for the frame.

Step 5: Assemble the raised bed. We nailed the corners together to make the square bed. I also added some nails to anchor the sides without the cleats to the cleats.

Step 6: Final assembly! Dave cut the PVC pipe into 8′ lengths, and then we installed them into the clamps in the frame. Oh, but first: we put down cardboard to kill the grass and any weeds that might make their way into the soil.


Step 7: The final step. We attached a PVC pipe to the top of the hoops to just make them a bit more secure. We used some nylon string to just tie it on.

The sun did peak through while we were working and we had a great afternoon.
Tomorrow: fill with soil. We’ll use a mix of some “wild” soil from a recently dug up area on our property (not dug up by us, for the record) and some sea soil and peat moss. And maybe also put the plastic up. We bought a 10’x16′ feet piece, because they come in 16′ lengths. We’ll probably have lots left over.
Filed under Garden, Life in General, Posts by Hana
How does an octopus reproduce?
In my job as a Marine Science Educator, I often get asked questions that I don’t know the answer to. In an effort to increase my own knowledge and better remember the answers to these questions, I thought I’d post the questions and answers here.
A few days ago, we saw a tiny juvenile octopus during a bottom dredge. A student asked me, “How many babies does an octopus have?”, which got me wondering about how octopuses reproduce.
It’s worth backing up a bit and reviewing some octopus biology. Here in Bamfield, we have two species of octopus that are fairly common: the giant Pacific octopus (Enteroctopus dofleini) and the Pacific red octopus (Octopus rubescens). They can both be found in shallow waters, including the intertidal, though the giant Pacific octopus can go as deep as 1500 m. Octopuses are known for their intelligence so much so that in some countries, they are considered “honorary vertebrates”. Octopuses also have complex physiology and anatomy when compared to most other invertebrates, including well developed eyes. Giant Pacific octopuses have even been documented to be able to recognize individual humans (though the sample size for the study was small) (Anderson et al., 2010).
Reproduction in octopuses is surprising. Both males and females are relatively short lived, and die not long after reproduction. In the male, the third right arm is specialized for reproduction and is called a hectocotylus. He uses this arm to insert a spermatophore (sperm packet) into the female. Within a few weeks of copulation, the male dies.
The female octopus can store the sperm and fertilizes her eggs once her den is ready. She will seal herself inside her den using rocks, and once the eggs are fertilized, she will lay anywhere from 20 000 to 100 000 of them in strings on the upper side of the den. She then takes care of the developing eggs by blowing sea water over them to keep them oxygenated and removing any organisms (such as bacteria, algae or colonial animals) that may grow on them. After several months (the length of time varies depending on species), the eggs hatch. The female then leaves the den and since she has not fed during the entire incubation period, she soon dies. The larval octopuses then spend some time as plankton before settling on the bottom to develop into adults. The life span of the giant Pacific octopus is about three to five years.
I found it surprising that the life history of octopuses seems to fall somewhere between r-selection and K-selection, given the high investment the female puts into looking after the eggs. But then I read that r/K selection theory is actually considered out of date! I learned r/K theory during undergraduate work in the early 2000s so I wonder if current undergrads are still being taught it. Something for another time.
Anderson, RC, JA Mather, MQ Monette, and SRM Zimsen, 2010. Octopuses (Enteroctopus dofleini) recognize individual humans. JOURNAL OF APPLIED ANIMAL WELFARE SCIENCE. 13 (3), 261-272
Filed under Ecology, Fauna, Posts by Hana
Quick updates
We still don’t have internet at home, so I’m posting fairly infrequent. That’s your first update. Secondly, I wanted to draw your attention to a blog that I’m really loving. It’s similar to our blog: recipes, ideas and thoughts on life’s experiences, but it’s all about city life in the UK instead of remote coastal living. Recently, Rutger posted an awesome and easy green tea ice cream recipe.
And finally, here’s some wildlife for you. In our new home, we’re absolutely surrounded by wildlife and I hope it continues to amaze us for years. I snapped this photo of a white tailed deer a few weeks ago.

The diversity of bird life also thrills us. I did manage to snap a few photos of the hummingbirds, but haven’t taken them off the camera yet. Yesterday we saw American Goldfinches, a Gray Catbird, a Red-Shouldered Blackbird, and several other species in a five minute span looking out of the kitchen window. And we’re not even putting out bird seed. More photos to come.
Filed under Fauna, Food, Posts by Hana
Hummingbirds!
We received a hummingbird feeder as a gift in the mail (thanks, Mom!) and I put it out last night. It was almost dark by the time the water had cooled enough to put it outside, so we didn’t have any visitors; but this morning, as soon as we were up and having breakfast, the birds were too!
We read a bit about hummingbirds and it turns out that they fiercely defend food sources as soon as they find them. Sure enough, there was lots of action around the feeder this morning. The first bird to find the feeder had a good long drink, and as soon as she saw another bird approach, she darted after it, chasing it away. We also read that the females use their tails to make territorial displays — fanning and flitting them up and down to show their distinctive tail markings. We saw this over dinner tonight and I realize that I had seen this behaviour many times in the past, but always just thought the bird was stabilizing itself in the air.
If you’d like to get your own hummingbird feeder, the recipe for the nectar is really simple: 1 part sugar to 4 parts water. I started with 1/2 a cup of sugar and added 1 cup of boiling water (having the water boiling helps dissolve the sugar). I then added a cup of cold tap water to cool things down. The feeder should probably not be put out until the nectar no longer feels warm. Do not put food colouring in the water. The birds are attracted to the little flowers at the bottom of your feeder, not the colour of the liquid. Colouring the water just exposes them to unnecessary chemicals. Birds don’t need these artificial chemicals which may even be harmful to them. (I’d also argue that we shouldn’t be eating food colouring either!)
Over the next few days I’ll try to snap a few photos of the birds at the feeder. In the meantime, here’s the view from one of our windows. (Oh yeah, did I mention we moved out of our temporary accommodations into a house?!) This garden next door is absolutely incredible. No wonder so many hummingbirds are hanging around here!
Filed under Fauna, Posts by Hana
Remote living skills: baking bread
I love fresh bread. About a year and a half ago, I started learning how to bake it myself. I was tired of soft, spongy, store-bought bread, which is not only bland, but also full of all kinds of completely unnecessary additives. Now that we live here, far from bakeries and grocery stores, I’m glad that I learned how to make my own. Here’s the secret to making your own bread at home: don’t be scared. It is easy and anyone can do it. And it doesn’t take much time either.
You don’t even need a recipe to bake bread, really. There are only 4 necessary ingredients, and as long as you have the amounts kind of close, you can bake a lovely homemade bread. I thought today I’d share generally how to make bread, and then over time, give some recipes that I like. (If you want to get fancy then you can follow recipes.) The four ingredients you need are: flour, water, yeast and salt. That is all.
Start by running water from the tap until it feels warm. Put one cup of the warm water into a bowl and sprinkle about a tablespoon of yeast in and stir until it is dissolved. (Just to emphasize that you don’t really need a recipe, any amount of yeast from one teaspoon to over a tablespoon would work). Add about a cup and a half of flour and about a teaspoon (or two) of salt. Stir this until you get a smooth, runny dough. Then add more flour. Probably about another cup and a half. Keep stirring and when it starts to come away from the sides of the bowl and the flour is all incorporated, it is about right. The dough should be kind of sticky (stick to your spoon), but not runny. If it is runny, or looks wet, add more flour. Make sure at least some of your flour is white flour – yeast really like it and the bread will rise better. If learning, I’d start by making a few all-white loaves before experimenting with different types of flours.
Now let it rise. You don’t have to knead it (gasp!). You really don’t. I’ve read so many recipes where people get all tied up in knots worrying about how long to knead dough (just long enough, but not overworked) that I think we should just forget about it all and not knead. So, to rise the bread, cover the bowl with plastic wrap tightly (if the wrap doesn’t make a seal, just put the whole bowl in a plastic grocery bag and tie it off with a twist tie. Leave the bowl in a warm place for an hour or two, until the dough has about doubled in size.
If you want, you can now get ready to bake the bread. If you’re busy and want to do something else for another hour, just squish the dough down, turn it over a few times until it is smaller, and let it rise again.
To bake the bread, first take the dough out of the bowl by pouring it onto a floured surface. Make it into the shape of loaf you want, and put it on a greased cookie sheet (I grease with either butter or olive oil). And let it rise again for a while. Preheat the oven to 450º and put the bread in. Immediately lower the temperature to about 375-400º. In about 30-35 minutes your bread will be done. Easy. (You can get all more fancy than this, and be careful at a few steps to improve your bread, but not worrying too much and just trying it will pretty much always make a wonderful bread that is much better than anything from the store.)
 Once it is out of the oven, let it cool on a wire rack (if you have one) for about 15 minutes. Enjoy with a lovely runny brie type cheese. Or with whatever you like.
Filed under Posts by Hana, Recipes
The raccoon came back
Last night, the raccoon came back to the porch. This time, he seemed to want nothing more than to be let into the house, or maybe given a snack! (Of course, there’s no way we were going to risk opening the door, or think about feeding him.)
He sat at the porch door looking very sad. When he saw me eating a piece of cheese, he stood on his hind legs to get a better look. He must of sat there for an hour! I imagine someone must be feeding him, given how unafraid he was.
I managed to snap a few photos, one with flash and the others without.


Filed under Fauna, Posts by Hana
